Some people find it difficult to locate small objects such as mouse pointers on the Mac screen. The reason may be because they have problems with image recognition or too many details on the screen at the same time. It’s time to Adjust the Mouse Pointer Size on your Mac PC.
Whatever the reason, making the pointer larger can reduce eye strain and save you time searching for more important tasks. Here’s how to adjust and enlarge the mouse pointer on a MacBook. In this article, we will show you how to change the mouse pointer size on Macbook as you like.
How to change the click before the mouse pointer on a MacBook?
- Access System Preferences by clicking the Apple icon in the upper right, then clicking on Accessibility.

- Click on Display in the left panel and you will find the Cursor size slider.

- Move the slider to adjust the size of the mouse pointer as you like.

Another way to change the mouse pointer on a MacBook
Change the color of the mouse pointer
In addition to resizing, you can also change the color of the pointer to make it stand out on the screen. This method is extremely useful for people who are color blind and have difficulty seeing the pointer on the screen. The steps are as follows:
- Go to System Preferences > Accessibility.
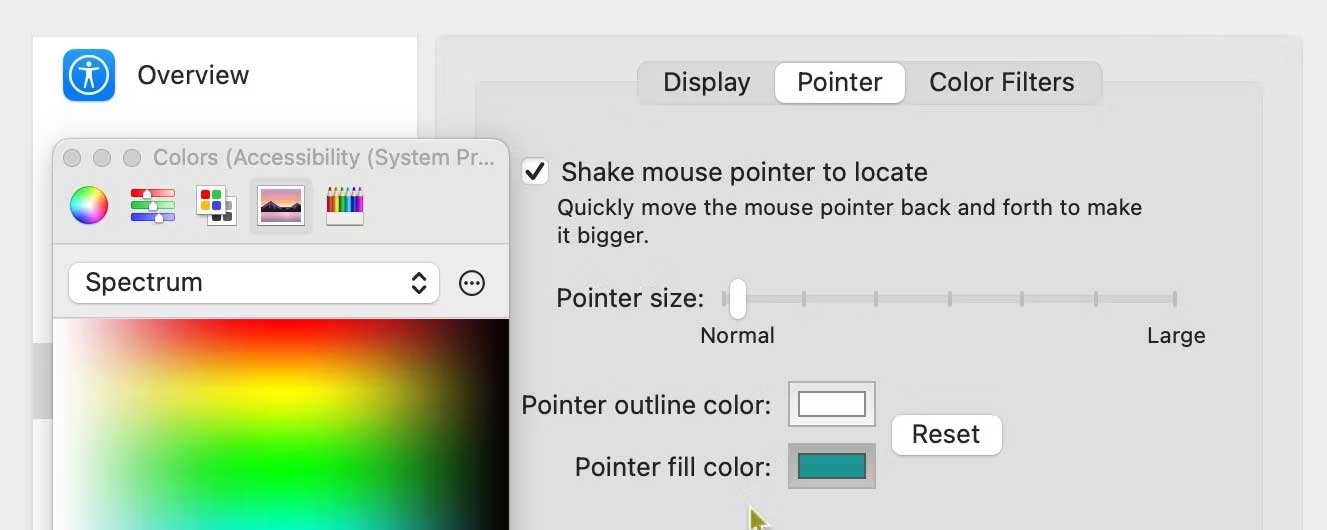
- Select Display, then click the Pointer or Cursor tab.
- Click the swatch next to Pointer outline color and Pointer fill color, and choose a color for the outline and inside of the cursor.
- Click a selection: Color Wheel, Color Sliders, Color Palettes, or Pencils to get the color you like best.

Change Macbook Mouse Pointer with Shake to Find
In Mac OS X El Capitan, Apple added a feature to dynamically customize the mouse pointer size when it’s hard to find it on the screen. It’s called Shake to Find.
This feature helps you locate the cursor on the screen when it is too small to be detected. Shaking the mouse or moving your finger up and down on the trackpad will make the pointer temporarily magnify and you can easily locate it on the desktop. When shaking stops, the pointer will return to its original size.
To enable Shake to Find, check the box next to Shake mouse pointer to locate it in the Accessibility panel above the cursor size slider.

It’s done. Now you just need to shake the mouse or hover your finger on the trackpad keyboard to zoom in on the pointer. The faster the shake, the larger the pointer. Stop shaking, it will return to normal size.
If you don’t want to set a larger mouse pointer size as a default setting, but only need a large size in some cases, consider enabling this mouse shake feature, because perhaps the large pointer will bring A little difficult to use during use.


