What is Mail Merge Outlook? How to send Mail Merge with Outlook? Let’s find out with QuoraTV! Microsoft Outlook is a personal data management software that supports sending emails quickly for office workers and human resource managers. You can find a lot of useful features, including Mail Merge Outlook.
Mail Merge is like an “old friend” that has been forgotten for many years. Undervalued and rejected until people really realize how much it is needed.
You don’t realize the potential of Mail Merge until you take on the job of managing hundreds of invitations, wedding cards, or red flags for something impending. At this time, it is difficult to hand-deliver the mailbox to everyone. Don’t panic, you always have a way to send multiple emails at once with the help of Microsoft Outlook.

However, before using this feature, you need to know some limitations when sending bulk mail on Outlook.
Why shouldn’t bulk send emails in Outlook?
- Unlike professional email marketing services, Outlook is not designed to send emails in bulk. Using it for this purpose, you may be disappointed by the following factors:
- Limit the number of daily emails: Similar to Internet service providers, Outlook limits the number of emails you can send per day, up to just 300.
- Lacks email design features, such as email templates and code sources.
- There are no reports or analytics to see how campaigns are performing.
- Bulk emails sent from Internet service providers (Outlook, Gmail, Yahoo…) are often labeled as spam on both the ISP side and the email recipient. Since webmail is designed for personal use, this activity is considered suspicious.
If you don’t mind that, here’s how to use Mail Merge in Outlook.

How to send Mail Merge in Outlook
- When should you use Mail Merge?
- Prepare the contacts for Mail Merge
- Compose personalized messages in Microsoft Word
- Enter the body of the message
When should you use Mail Merge?
Mail Merge is used when you want to create multiple documents that are essentially the same but each contains its own details. Emails have the same format and content as well as graphics if applicable. For example, an invitation card has everything the same except for the name, address, etc.
Unlike sending messages to a group of people, mail merge makes each recipient of the message unique.
The Mail Merge feature uses two parts:
- The main document (here: Microsoft Word) where you write the body of the email.
- The source of the change data (here: Microsoft Outlook Contacts) is usually the address and name of the recipient.
These two parts are “merged”. With Outlook as part of the Microsoft Office suite, you can use this feature to send mail to multiple people, each personalized to a separate contact.
Microsoft Office allows you to use different data sources for these address details, for example, you can use an Excel spreadsheet or even an Access database. Here, you will use your Outlook contacts to send emails.
Prepare the contacts for Mail Merge
You perform the following steps after you launch Outlook:
- Open People to display your contact list.
Select the contacts (Ctrl + Click) that you want to include in the personalized email list. To easily manage a large list, use the built-in Sort option (click the down arrow next to All). You can sort by category in the same drop-down menu.
Sort contacts by color category
Your contacts are too long? The fastest way to organize them neatly is by color, such as blue for co-workers, red for family & friends, green for community organizations & members. You can use pre-made color categories or create your own, and give them meaningful names (like co-workers instead of blue). Then sort by color to focus on the contacts you want.
Available color categories in Outlook include blue, orange, purple, red, yellow, and green. To add an existing contact to one of those categories:

Click People > Right-click the contact you want to categorize, click Categorize, and then click the color you want.
Go to View > Current View > Change View > List, scroll to the right to see the Categories column, and see which categories you’ve attached contacts to.
Tip: When you create a contact, you can also assign it a category by color. When you have filled in the information in the Contact box, click Categorize, and then select the folder you want.
Note: Mail Merge does not work with distribution lists.
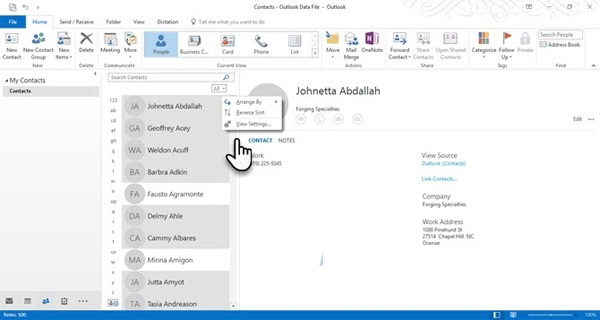
- From the Ribbon, choose Mail Merge > Hone > Actions Group.

- In the Mail Merge Contacts screen, select Only selected contacts if personalized emails are sent to the selected contacts. Under the Merge option, choose the following parameters:
Document type: Form Letters.
Merge to: Email
Message Subject Line: The subject line remains unchanged for all emails. Therefore, you choose This Will Get Your Attention.
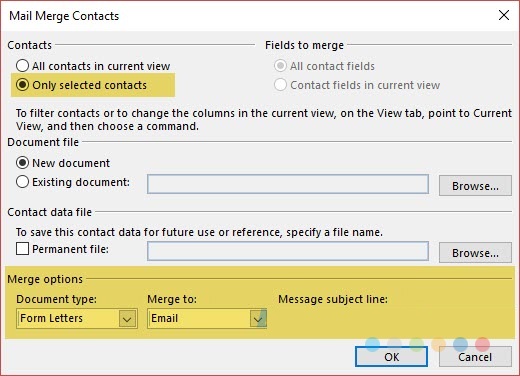
- Click OK and then Microsoft Word will launch for you to compose your personal message.
Compose Personalized Messages in Microsoft Word
At the Mailings tab on the Ribbon, select Greeting Line to start the message with greeting lines.

As you can see here, the dialog box is pre-populated. This is just a placeholder for names from your contact list. Right below you can check out a preview of the names from your list. You can customize the items with the options given here.

Notice that the Merge field comes from the column headers of your mailing list. So if there is a mismatch, use Match Fields to ensure that the merge stays correct. If the field you want says Not Matched, click the drop-down list for that field and select the column name that matches that column in your list.
When you clicked OK, a placeholder field for the greeting line was displayed in the Word document. You can enter more information for the document with additional fields.
Click on Insert Merge Field. This data should be displayed in your original data source which in this case is contact information in Outlook.
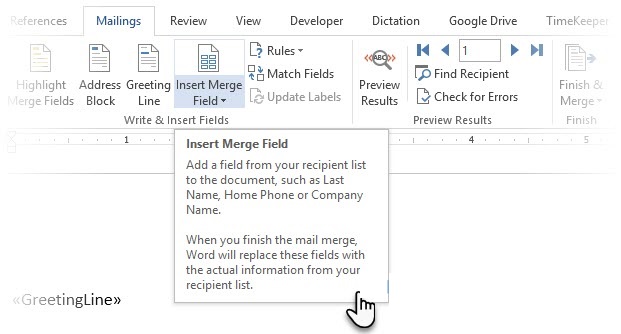
To format the greeting line the way you want, highlight the whole field, including the trailing marks. Go to the Home tab and use the Font settings. Also, set Line Spacing to ensure that the line spacing matches the spacing in the rest of the document.
Enter the body of the message
The preamble of the message is the GreetingLine placeholder and/or whatever fields you inserted with the help of additional merge cases. Now, you can start composing the body of your message.
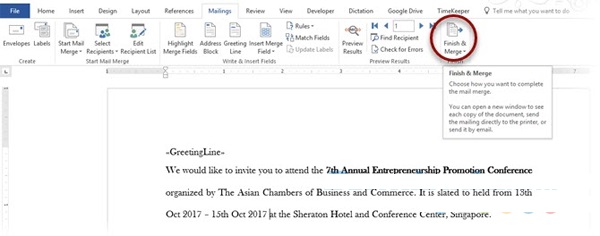
When the body of the message is complete, click Finish & Merge > Send Email Messages. Click OK in the Merge to the Email dialog box.
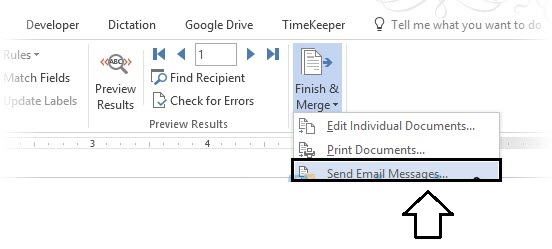
Word then sends individual messages to each corresponding email address. You cannot CC or BCC other recipients and you cannot add attachments to emails.
You can save the document you used for the mail merge because it also saves the link to the data source i.e. contacts. When you open the mail merge document, choose Yes when Word prompts you to keep the connection.
Once you know how to send Mail Merge using Outlook 2016, the process only takes a few minutes. Also, instead of composing each email for one person, you can now do it & send messages to the whole group without regard to the number of members. It’s great, isn’t it?
In addition to the above method, you can use 3rd party mail merge tools. Here are some suggestions that you can try:
Mail Merge Toolkit by MAPILab
- Full integration with Mail Merge Wizard gives you more mailing options.
- Merge mails with attachments or another file for each recipient.
- Option to set CC and BCC to the receiver.
- Allows customization of Subject – Subject of the email.
Send Individually by Sperry Software
- Easy to use
- Automatically generate a personalized email from the address you entered in the To field.
- There are separate merge cases linked to contact information that you can use in email messages.
- Supports a simple txt file as a mail merge source with email addresses for each line.
Send personally by MAPILab
- Easy to use.
- Automatically generate personalized emails from the address you entered in the outgoing field.
- There is a separate mail merge field associated with the contacts.
- Allows creating exclusion lists.


